Have you ever powered up your system and immediately thought, “something doesn’t sound right?” While it is rare, it’s possible one of the passive driver units (woofer or tweeter) in your speaker may not be operating properly. Once the sound anomaly is discovered, it’s time to investigate and use the process of elimination to identify the culprit. The following steps do not require an ohm meter.
Troubleshooting passive speakers is a relatively short process and in most cases is fairly simple. For starters, you will want to identify that all the settings in your receiver are set properly. If you are testing just your front left and right passive speaker, you’ll want to make sure that your receiver is in stereo mode to ensure both speakers are receiving signal. If you’re testing your full surround, then make sure your receiver is set to multi-channel surround mode. Now, once you hit play, you should be able to hear sound from all of your speakers.
The most easily identifiable sound quality is the treble and high frequency range. Usually if a tweeter is not working, then the sound of the speaker is most commonly described as:
- Hollow
- Nasal
- Lack of stereo imaging
- Vocals have a lack of articulation or annunciation
- Lack of cymbals from a drum set or “string talk” (the sound of fingers scraping across guitar strings)
There are a couple of ways to troubleshoot this. First you can tightly cover the tweeter with your hand and if there is no change in sound upon removing your hand, then it’s likely that the tweeter is the problem. However, you’ll want to ensure that the crossover is not the culprit by removing the tweeter and testing it independently of the speakers crossover.
If it’s not the tweeter, then it’s likely the woofer and there are a few terms used to describe this:
- No bass
- Mid-range sounds muddy
- Shrill or excessive high frequencies
- Extremely bright
- Only hearing the tweeter
- Lack of presence of sound
- Small sound field
- No impact
You will want to inspect the woofer and there are a few ways to troubleshoot this. If your speaker is bi-ampable like our Verus III Grand Bookshelf Speakers, then you can try removing the jumpers from the speakers binding posts, and running the speaker wire to either the top set of binding posts, or the bottom. Usually the top set corresponds to the tweeter, and the bottom set to the woofer. Again, you will want to ensure that the crossover is not the issue by removing the woofer and testing it by itself.

How to Remove and Test Drivers and Tweeters
Step 1 – Remove cloth grill to expose tweeter and driver

Step 2 – Remove screws from around the speaker. There are 6 screws for the driver and 4 screws for the tweeter.

Step 3 – Cup the driver/tweeter with your hand and tilt the speaker to catch the driver when it comes out.
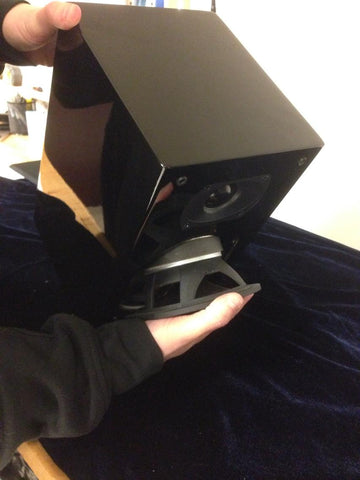
Step 4 – Remove the positive and negative wires from the driver/tweeter

Step 5 – Use the speaker wire from one of the front channel speakers and hold the ends to the driver terminals. Make sure sound is playing from the receiver and you should hear sound through the driver/tweeter

Verus Tweeter Removal Guide
Step 1: Once the grille is removed, locate the tweeter. 
Step 2: Remove the rubber surround. Be careful not to tear the rubber or damage the baffle . A butter knife works really well. We recommended prying from the inside to avoid baffle damage. The rubber is held on with an adhesive, but is not too difficult to remove.
Note: When reapplying, a few dabs of silicon gel will hold surround in place.


Step 3: Remove the 4 screws in the outside corners.


Step 4: You will most likely need to clear any residual putty from between the tweeter and housing so it may be removed more easily.

Step 5: Remove the tweeter. The easiest way is to hold on to the bridge and pull the tweeter out. If this proves difficult, then tilt the speaker on its face and tap the back of the speaker to dislodge the tweeter.


Step 6: Disconnect the driver from the wires. Take note that the yellow wire connects to the contact with the red dot. This is the positive connection.

Step 7: You are now ready to connect the new tweeter. Just follow these steps in reverse order and you will be on your way to more sonic bliss!

Now that you know these troubleshooting steps and how to apply them, it's time to fix up your speakers! Contact your manufacturer to see if the parts are available. Otherwise there are many DIY options that could help get your speakers up and running again.
Shopping for Speakers?